Directory

July 28, 2011

Trinity Alps Castle Lake Trail to Mount Bradley Lookout

Castle Lake, Shasta National Forest, California to
Mount Bradley Lookout is a 12 mile day hike, excellent to
view wildflowers, but best of all, Mount Shasta from
numerous angles for fabulous photographs!

Mount Shasta 2011
Hike Difficulty: Strenuous and Difficult  (for miles and lack of trail maintenance, hard to find at times)
Distance Hiked:  just under 12 miles out and back
Elevation Change:  2582 feet per Garmin Basecamp
Trail Tread Types:  Pine needle covered packed soil, double tread to single tread, loose rocks, wet and dry stream beds.

     Along the trail Shasta would reward our efforts with stunning views, before the trail would turn or descend and hide her glory again and again.  I hope this post entices you to consider this hike soon! The trail head began at Castle Lake.
Driving Directions:  We drove on I-5 to Central Shasta exit, then followed signs to Castle Lake. Go to Wikiloc Trails  for GPS tracks; a small map is shown below.

     The trail was mostly clear to follow but GPS helped us navigate since in some places it simply vanished.  Long sleeves and long pants (convertibles) with good hiking boots and poles are recommended due to thick overgrown manzanita.


      There were swimmers and fishermen and a crowded parking area when we arrived, but they filtered out quickly as evening approached and we found our first campsite by following the trail to the left toward a small creek crossing.

TAKE THE BUG SPRAY!  No Joke!


     Several campsites are available alongside this trail toward the east of the lake, but we veered left at a small fork and meandered until we found our more private site away from the lake and its visitors.  The creek (possible water source) near us was through this little bushwhacking shown in the left photo above.

     The trail starts at Castle Lake and climbs to the east of the lake.  
There is an unnamed pond and then you'll come to Little Castle Lake (not much more than a pond and difficult to get close to due to the thick brush.

     The trail ranges from rocky to meadows to forest to very old double tread and through unmanaged vegetation.  We had luck with breezes to cool us despite a hot day and areas without shade.


     Hike uphill through the forest and then you begin crossing the saddles and will find astoundingly beautiful views, one after another.


     The heavy manzanita is difficult to wedge through especially if you are wearing a pack.  It stood taller than us and caught on my pack, pockets, poles, shoes.....  but onward to the promising views that are as breathtaking as any hiker imagines.

"The Crags"
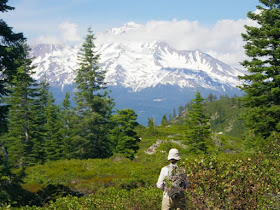
Sneak previews of Shasta along the trail ahead.


     Across the last two saddles we enjoyed the vistas in every direction!  We could see the trail far ahead going up and down the saddles over to the barely perceptible lookout.  The oddity was traveling all this way on foot and arriving at the dirt road leading into the lookout area!  Surreal!  Where is the holy grail now?


Black Buttes
More of Shasta tantalizing hikers onward!

Mount Bradley Lookout
     We put up our dusty feet and soaked in Mount Shasta and the surrounding views in the shade of the lookout.

     This hike could be satisfying and shorter if you stop at the last saddle.  It is a narrow old section of wide rocky trail but the views, in our estimation, were best from the top of the peak before the last saddle that crosses to the lookout.  If you're interested in the historic and now unmanned lookout, it was a pleasant resting place.

As we continued......

     Upon our return to camp, having hiked this as an "out and back", we found a closer camp than before and settled in.  The bugs must have bred while we were away...I was sure there were more of them!
Here are some shots of the lake (and flowers) before the breezes or people disturbed it in the morning:


     Castle Lake is very shallow at the side nearest parking, but is 120 feet deep across on the granite side of the bowl, and its surface covers 47 acres. It is classified as a glacial lake.

     Enjoy your hike and let me know how you fare!
     I read an account of this hike in Trinity Alps Vicinity by Mike White.  He offers a multitude of hikes in the area with directions and extensive details.  Note that it can't be updated about trail conditions so check out your interests with the Forestry and the internet before you set out on your hikes.

Trinity Alps (near Redding, CA)
miles


·         Trinity Alps Coffee Creek Loop
40ish
Strenuous
12
Strenuous and Difficult
·         Trinity Alps (Hobo Gulch)
backpack
Strenuous!
 and check out
Peachy Hiker's Table of Contents

Happy Trails!
Edited 7-2014


July 11, 2011

Lyons Creek Trail Fun & Hazards in Early Spring

 
17 photos are included. If you click on one, the photos can be viewed enlarged.
For a report done June 2014 see Lyons Creek Trail.
Elevation: we began at 6721 feet, and Sylvia Lake was 8200
feet, still frozen and surrounded by snow.
Distance: It is reported as 4.6 miles each way, but be reminded you'll
go a bit further trying to route yourself around dangerous snow banks. 
Notes:  Parking is available, but no bathrooms or porta-potties.
The road up was clear of snow to the Lyon Creek TH free parking. The Pacific Ranger Station, off of Highway 50 on the way to the Wrights Lake and Ice House Road, provides backpacking
wilderness permits and some excellent assistance planning your hike.
Driving Directions: 


Take Wrights (Lake) Road north off of Highway 50 at Kyburz.  The Wrights Lake Road will be between tract 36 and tract 39 along Highway 50.

Follow the signs to Lyons Creek Trailhead. If you reach the Bloodsucker Trail parking, you have gone too far.
 The actual Lyons Creek Trail is not visible at this time, and most people hiked following footprints in the snow and intermittently, the muck (sticky, boggy ground).  My boots would sink in those areas and had to be Pulled Out!  Waterproof boots are better, safer, more functional, than all the tennis shoes and sandals I saw people leave the parking lot wearing.  It is hard not to walk in and through streams of runoff, freezing your toes!  Honestly, one hiker came back from Lake Sylvia with signs of hypothermia: tingling, redness and numbing of their toes. The snow softens during the day with this nice weather so your feet will be ankle deep in the cold.

 The weather is as perfect as heaven would have it.  The views are excellent.

Here are some of the photos of my hike from the parking:
The trail teases one in with solid ground and a regular hiking tread mix of rock, dirt, and some vegetation sprouting.

The views of the mountain tops sprinkled with snow were barely visible through the trees.  On the down side, these wet and boggy areas are swarming with tiny black bugs who get in your nose and mouth and maybe more!  Breath with your mouth closed!

Groupings of many types of wildflowers were scattered along the way.  Honestly, with my backpack, I only stopped for a few since they were so low to the ground and my pack felt pretty heavy!


Much of the trail had become gutters for the runoff, streams to walk in, and this spot was a small dilemma....which creek was the path?  I crossed straight ahead from this view and it turned out to be the right creek to follow!  As I said, be ready to get your feet wet!

My excitement grew while the mountains became more visible through the trees.  The trail is about a 10 mile round trip, more or less depending on how much detouring you have to find, and if you visit more than one lake.
My boulder-hopping-self felt like a child just before a party!  Anticipation!

I stopped for a rest beside the creek because I could hear the rushing sound of the current pushing its way through the narrow places.

Does ears were breaking ground anywhere not blanketed in snow or rushing with streams of runoff.  Grasses and wildflowers were in abundance, and while you might think it a great place for a picnic, if you walked there it was just a muddy mess full of bugs. 

This is one of the sections of "trail" developed by the numbers of people out that day.  The parking lot had been full, mostly for day hikers.  We only saw two sets of backpackers.  With packs, the soft snow was similar to our previous snow hike, like walking in dry sand with a backpack.  Barefoot. It is a workout!


Lyons Creek was rushing and I personally would not cross it.  The water flow was unbelievable, especially in narrow areas.

 The trail was often lined with various sizes of smaller rocks.  I enjoyed that but if you have feet and/or ankle problems, it may wear on you.  Take your support gear and be prepared.  Again, hiking poles can help your knees and ankles, along with good boots made for this type of ground.

The elevation we began at was 6721, and Sylvia Lake was 8200 
feet and still frozen and surrounded by snow. It is reported 
as 4.6 miles each way, but be reminded you'll 
go a bit further trying to route yourself around dangerous snow 
banks.  Parking is available, but no bathrooms or porta-potties.  
The road up was clear of snow to the Lyon Creek TH free 
parking.  The Pacific Ranger Station, off of Highway 50 on the 
way to the Wrights Lake and Ice House Road, provides backpacking
wilderness permits and some excellent assistance planning your hike.


The Fine Print: Information about safe snow hiking:
I have enough concerns about the hike to caution hikers about the snow and trail conditions before anything. The photos above illustrate what "under-melt" hazards really are. The snow, especially around rocks and trees, is melting faster than the exposed surfaces. The water runoff from melting snow all around is running in streams, some obvious and rushing, others just large flat areas of wet water flowing over the saturated ground surface. It is also melting the snow where isn't visible. Pockets, even caverns, of air and water are created under the mounds and blankets of snow being used as "the trail".
One adult male, with a fully loaded backpack, fell into the snow hip deep due to the caverns of air that are not visible under drifts that look deep and stable. He also had one instance when he fell through and could not touch ground. He had to figure out how to get out of that predicament and did not want to lose his backpack (although he admitted considering it after several of these cave ins!). He ended up working to throw his body weight downhill (backwards) to leverage the weight of the backpack in his own favor and pull him out of the hollow. Fortunately for him, that worked!
Another male day hiker had the same problems with cave ins of snow, especially as the snow got deeper in higher elevation. Another male hiker had to turn back because the soft snow and rocky trail were hard on an old knee injury. Sometimes I saw the remnants of cave ins, one RIGHT next to all the footprints, which suggested to me that people were ignoring the hazards and still walking over the thin areas.
Another thing to look out for are tree falls under the snow. The branches themselves created air hollows where the snow could not pack in as heavily, and created a greater likelihood of injuring the hiker who might step there believing they can land on a branch or something so they can keep going rather than reroute, perhaps finding open ground or more stable snow.
I saw more people than I counted, many wore shorts, tank tops, tennis shoes or even sandals.   From personal experience with unpredictable weather and events in mountainous areas, no one should go without first aid and survival basics, particularly appropriate layers of clothing.
My advice and urging are to wear boots, long sleeves and pants, use hiking poles to test the snow, to use to support your weight, and at times assist you if you break through. Watch your steps. and choose your paths carefully. Look for the caverns or hollows under the snow, and avoid rocks and boulders protruding but surrounded by snow, as they have those hollow hazards too from the heat they contain that melts the snow faster than general conditions.
I fell in less than knee deep several times as the snow softened, and as much as possible tried to go around the snow. I loved my waterproof boots, warm hiking socks, and gaiters! Take first aid and snacks, and carry out your trash. Take a camera!
Please use caution and have fun!!!


For more hikes check Peachy's Trails by Location
with mileage and difficulty ratings, and
these Desolation Wilderness Trails:
6.8+
Strenuous
·         Tahoe Rim Trail
165
9.2
Strenuous
10+
Strenuous
7.95
Strenuous
9.2
Strenuous
6+
Strenuous
3.8
Moderate
·         Horsetail Falls & Pyramid Creek
3-11
Easy to Strenuous and Difficult
 10-18+ RT
Moderate- Strenuous
·         Rockbound Trail to Maude Lake
10
Strenuous


Happy Trails!

July 03, 2011

Harvego Bear River Preserve Hike

Hikers being introduced to the ranch.

Working ranches are hosts.

We hiked 5.21 miles through part of the Harvego Bear River Preserve.  I found out about this hiking opportunity through a webpage, and decided to attend.  These are only available at this time by making reservations for docent led hikes.


The Harvego Bear River Preserve consists of  1,773 acres which are a part of the 2,300-acre Bruin Ranch,

located in the woodlands in the Auburn Valley-Bald Rock Mountain area. The ranch is west of Highway 49, past the Auburn Valley Golf Course, and south of the Bear River.


 This was a lucky shot I thought I missed because the dragonfly flew away when I moved.  Surprise for me when I downloaded my photos and there it was!  I think it is a Flame Skimmer.


 These are two fine docents for the Preserve, Andy and Anita, who volunteer to support the future of this project.  Great folks!!!

Poison oak was all over the hills, but avoidable only if you stay right on the trail. This photo provided by Steve V.


 These are hikers on this ranch tour, many from a Meetup group, and some registered on their own.  All were enthusiastic and fun participants.
Woodland the trail meanders through.
Clear-Winged Grasshopper, photo and identification provided by Steve V.


 The Bear River running far below our hike today.


We hiked off trail to the top of Bald Rock Mountain to enjoy the views.  From here, our docent leaders pointed out where the trails are being built and oriented us to other features of the area.  Beyond the golf course, for example, is Hidden Falls, and to the right is Bear River winding through the canyon.

View from the top of Bald Rock Mountain.

Downy Navarretia


 These were hard to photograph both because they are minute flowers and with a small breeze, it was hard to focus on such small gems.  They are much smaller than the tip of my pinky!
Steve V.  provided scientific names of flora we observed and photographed.

Heading up through the shady trees.
One of the several ponds we passed.
 Here I wanted to get in a boat and lazily float the day away, I had to persevere and hike onward.  The day was hot but not unbearable, and the hiking was moderate in difficulty.  Please check out the website for the preserve and support our public lands too.
Related Articles:
ASRA ~ Auburn State Recreation District
Peachy Hiker's Table of Contents